Sewing while using Lutterloh
ewing is one of my favourite hobbies. Creative, relaxing (well, most of the time), improving skills, problem-solving, good for the environment, less fast fashion, my clothes are unique… there are just so many reasons why I love sewing.
The system
Although I’ve been sewing since I was a student, I only heard about the Lutterloh Pattern System a few years back when watching one of my favourite YouTubers, withwendy. She’s a sewer and often uses patterns from this system. She also manipulates patterns – bodice from one pattern, sleeve from another and so on – to create what she wants and that really intrigued me. Unique designs!
Also using the Lutterloh system you only need two measurements for the perfect fit. The bust and hip measurements.
So, after I’ve researched what the system can do and can’t do, my lovely family gifted me ‘The Golden Rule’ and since then I’ve been cutting patterns and done some sewing. It is something to get used to, I have to admit, because there are no step-by-step instructions once you have cut your pattern and fabric. But the more I use it, the better my understanding of it becomes.
Some background
This pattern system was developed in West Germany in 1935 by Ms Maria Aloisa Lutterloh. She took inspiration from the art theorists of ancient Greece’s idea of the ‘Golden Ratio’ and worked it into her dressmaking techniques. This way she found proper relative measurements for different parts of the human body. The most famous interpretation of this ‘Golden Ratio’ or ‘Golden Rule’ is in the iconic illustration by Leonardo Da Vinci, of a man with arms outstretched in a circle and square, with the measurements and formulas inscribed within the drawing.
When Ms Aigenberger saw this Golden Ratio, she went to work and the timeless and elegant dressmaking solution came into being.
The human body is in perfect mathematical proportion within itself. Artists like Leonordo Da Vinci have used this knowledge to create beautiful masterpieces. For example the distance of your outstretched arms from fingertip to fingertip equals your body height.
Starting…
First of all you need to get the Golden Rule. This includes a French curve, the original tool developed for pattern drafting, as well as the tailor and designer curve. You also receive a sizing scale measuring tape which works specifically to draw your own patterns.
When reading the Lutterloh patterns you only have to know your ABC’s. You sew from A to A, B to B and C to C. Also, this is the sewing sequence, which means you first join the A’s, then B’s and so forth.
When you purchase the Golden Rule you also get a book with patterns. Every season new patterns appear on the Lutterloh website which you can buy separately. Different symbols on the patterns have specific meanings, like A = front, B = back, FF = hood, et cetera.
Construction process
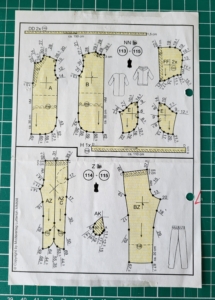
 Decide on the pattern you want to make. I decided on the one as seen in the picture.
The front gives you the finished project and the variations. The back page gives you the different pattern pieces.
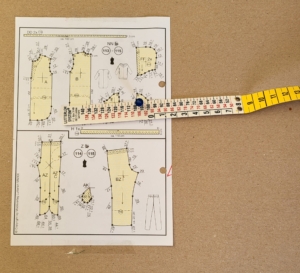 You then use your own two measurements and this specific sizing scale measurement tape to make your pattern pieces. Remember for pattern pieces above the middle use the bust measurement and pieces below the hip measurement.
Find the bust measurement on the sizing scale and push the pin through the corresponding line on the scale. Align the edge of the sizing scale parallel against the line with the number on the pattern. Extend the measuring tape and draw a dot onto the paper.
After you’ve made all your dots, use the ruler to draw the straight lines first. Then use the curved edge for the curved lines. Transfer all the markings from the pattern diagram onto your pattern. Cut out your pieces.
The finished pattern matches your exact measurements.
 Here I’m busy cutting out the pieces of the fabric with my pattern pieces I made using the Lutterloh system. As you can see the sleeve looks different from the one in the picture. That is because I didn’t want that exact sleeve, so I just lengthened it. Also, these are just some of the pieces of the pattern.
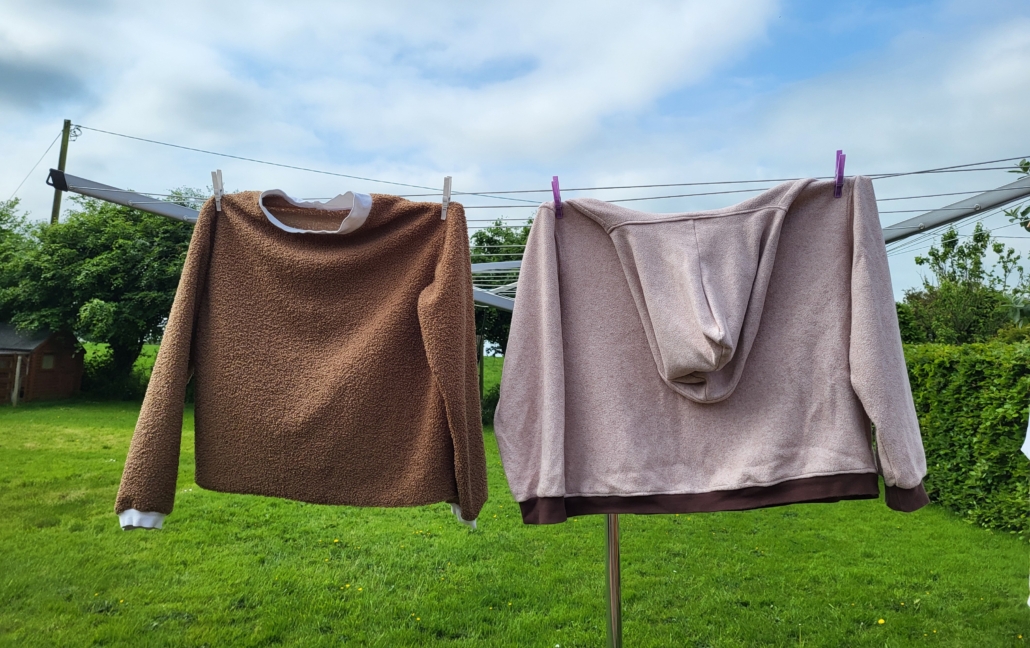
I added ribbing to the sleeves and around the neck. A previous top I made, I added ribbing at the bottom as well. Also, in my previous one I added the hood, but not with this one.
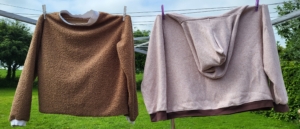
See the two finished tops.
Until next time.
Slán
![]()


")
Leave a Reply
Want to join the discussion?Feel free to contribute!